
Espresso lovers know that crafting the perfect shot is no simple task. There’s a lot that goes into it—from selecting the right beans and achieving the perfect grind size to ensuring precise water temperature. But one aspect that often gets overlooked, particularly by beginners, is the process of espresso tamping. Although it may seem like a small step, proper tamping plays a critical role in achieving that rich, flavorful espresso we all crave. In this article, we’ll dive deep into the art of espresso tamping and why it’s one of the most crucial steps in making a great espresso shot.
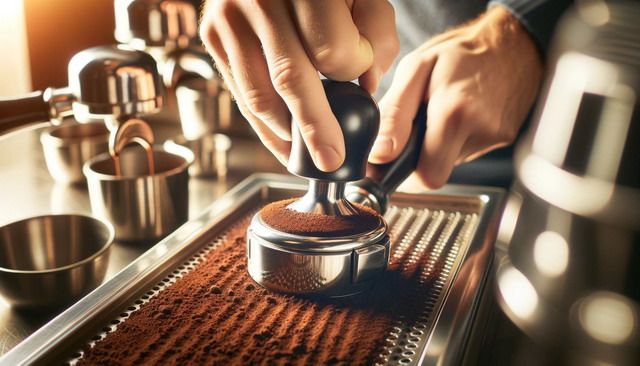
What is Espresso Tamping?
Before we get into the specifics of why tamping matters, let’s first define what it is.
Espresso tamping is the process of compressing ground coffee in the portafilter of an espresso machine. After the coffee is finely ground and distributed evenly into the portafilter basket, a tool called a tamper is used to press down the coffee grounds to create a smooth, compact surface. This compacted coffee puck is what allows water to evenly pass through the grounds during brewing, ensuring proper extraction and, ultimately, delivering a balanced and delicious espresso shot.
At first glance, tamping might look like a simple, even mundane task. But in reality, the way you tamp—whether it’s the pressure applied, the distribution of the grounds, or the angle at which you tamp—directly impacts how water flows through the coffee. This, in turn, influences the taste, texture, and consistency of the espresso shot.
For instance, if the coffee is tamped unevenly or with too little pressure, water can flow too quickly through the grounds, resulting in under-extracted espresso that tastes sour and weak. Conversely, if the grounds are tamped with too much pressure, water flow may become restricted, leading to over-extracted espresso that is bitter and astringent.
So, while it might be tempting to overlook tamping as just another step in your coffee-making routine, mastering the technique can dramatically improve the quality of your espresso.
Why is Espresso Tamping Important?
To understand the significance of tamping, it helps to appreciate the science behind espresso extraction. Espresso is created when hot water is forced through finely ground coffee at high pressure, usually around 9 bars. In just 25-30 seconds, this process extracts the soluble compounds in the coffee, which include flavors, oils, and aromatics. These compounds contribute to the espresso’s unique taste and mouthfeel.
However, achieving the right balance of extraction is tricky. Too much extraction, and you’ll pull out undesirable bitter compounds. Too little, and you’ll end up with an acidic, watery shot. That’s where tamping comes in—it helps create the ideal resistance for water to flow evenly through the coffee grounds, giving you the best possible extraction.


- Even Extraction: When tamping is done correctly, the compacted coffee puck creates an even surface through which water can pass uniformly. Without this uniformity, water will naturally follow the path of least resistance, leading to an uneven extraction process. Some parts of the coffee puck may be over-extracted, while other parts are under-extracted, resulting in a shot that lacks the complexity and balance of flavors that espresso is known for.
- Consistency: Professional baristas strive for consistency, where each espresso shot pulled tastes the same. Espresso is a game of precision, and tamping is one of the key steps in achieving consistent results. Once you’ve dialed in the correct grind size, tamping pressure, and technique, you can replicate that same shot over and over again. Consistency is particularly important for commercial cafés, where customers expect the same delicious cup every time they order.
- Crema Quality: The tamping process also contributes to the formation of crema—the golden layer of emulsified oils that sits on top of a properly pulled espresso shot. A well-tamped espresso puck allows the pressurized water to extract these oils evenly, enhancing crema production. Crema is not only a sign of a well-made espresso but also adds a rich, velvety texture to the drink, elevating the overall experience.
- Control Over Extraction: By mastering tamping, you gain control over the rate at which water flows through the coffee grounds. This flow rate directly influences how much flavor is extracted. For example, if your espresso is tasting a bit too bitter, you might try adjusting the tamping pressure to slightly reduce the extraction time. Similarly, if the shot is coming out too sour, a firmer tamp may help increase extraction and balance the flavors.
The Physical Aspect of Tamping: Pressure and Technique
Tamping isn’t just about pressing down the coffee—there’s a science to how much pressure you should apply and how you distribute that pressure across the puck.
- Tamping Pressure: One of the most debated topics in espresso-making is how much pressure to apply when tamping. Conventional wisdom suggests that you should tamp with about 30 pounds of pressure, but many baristas and experts have found that applying anywhere between 15-30 pounds of force can work, depending on factors like grind size and machine settings. The key is to apply consistent pressure each time you tamp to maintain uniformity in your espresso shots.
- Tamping Angle: Another common mistake among beginners is tamping at an uneven angle. When tamping, it’s essential to hold the tamper perfectly level to ensure the coffee grounds are compressed evenly across the surface. Even a slight angle can lead to channeling, where water flows more easily through one part of the coffee puck, resulting in uneven extraction.
- Distribution of Coffee Grounds: Before you even begin tamping, it’s crucial to distribute the coffee grounds evenly in the portafilter basket. Uneven distribution can cause the tamper to compress the coffee unevenly, leading to channeling and poor extraction. Many baristas use a technique called “polishing,” where they gently twist the tamper after the initial compression to smooth out the surface of the coffee puck.
Espresso tamping might seem like a simple, mechanical task, but it’s a critical component of pulling a perfect shot. By understanding the nuances of pressure, angle, and distribution, you can dramatically improve the quality of your espresso. In the next sections, we’ll explore different tamping techniques, tools, and common tamping mistakes to help you become a true espresso master.
Tamping Pressure: How Much is Enough?
The amount of pressure applied during tamping is one of the most hotly debated topics in the espresso community. Traditional advice suggests using about 30 pounds of force, but in recent years, many experts have found that a precise amount of pressure isn’t as critical as once thought. However, consistency is key. Whether you’re applying 15, 20, or 30 pounds of pressure, doing it the same way every time is essential for achieving balanced shots.
The Science Behind Tamping Pressure
To understand why tamping pressure matters, it’s important to dive a little deeper into the mechanics of espresso extraction. As mentioned earlier, the process involves hot water being forced through finely ground coffee under pressure. The role of tamping is to create a compact, even puck of coffee that provides uniform resistance against the flow of water.
When too little pressure is applied during tamping, the coffee grounds are loose, allowing water to pass through too quickly. This results in under-extraction, meaning the water doesn’t have enough time to fully extract the flavors from the coffee. Shots that are under-extracted tend to taste weak, sour, and flat.
On the other hand, applying too much pressure can lead to over-extraction. When the coffee is packed too tightly, water struggles to pass through, resulting in a slow, uneven extraction process. Over-extracted espresso often tastes bitter, harsh, and overly intense.
Therefore, the goal is to find a balance. While there’s no magic number for tamping pressure, aiming for around 20-30 pounds is a good starting point. More important than the exact number, however, is making sure you apply consistent pressure with each shot. Baristas who develop muscle memory for tamping will naturally tamp the same way every time, creating a smooth workflow and consistent results.
Tools to Help Measure Pressure
For those just starting out or aiming for extra precision, several tools can help you measure tamping pressure. Some tampers come equipped with a built-in pressure gauge that clicks when a specific force is reached, ensuring you apply the same pressure every time. There are also smart tampers with digital readouts to display the amount of force applied. While these tools can be useful for beginners, seasoned baristas often rely on experience and feel to gauge the correct amount of pressure.
In summary, when it comes to tamping pressure, consistency trumps exactitude. Aim for a level, even tamp with a moderate amount of pressure, and you’ll be on the right track to pulling excellent espresso shots.
The Ideal Tamping Technique
The art of espresso tamping is not just about how much pressure you apply but also how you apply it. Proper technique is critical to ensuring that your tamp is level and even, which helps produce a balanced extraction and a shot full of rich, nuanced flavors.
Step-by-Step Guide to Tamping
- Prepare the Portafilter: Begin by grinding your coffee beans to the appropriate size, which should resemble fine sand. Distribute the coffee grounds evenly in the portafilter, ensuring that there are no clumps or pockets of air. Some baristas like to gently tap the portafilter on the counter to settle the grounds.
- Position the Tamper: Hold the tamper with a firm grip and place it in the portafilter basket. Make sure the tamper is level—this is one of the most important aspects of tamping. An uneven tamp can lead to channeling, where water flows through only certain parts of the puck, resulting in poor extraction.
- Apply Pressure: Push down with moderate, consistent pressure. Aim for around 20-30 pounds of force. Once the grounds are compressed, gently twist the tamper (often referred to as “polishing”) to smooth the surface of the puck. This helps create an even distribution of coffee grounds and prevents water from finding weak spots to flow through.
- Check Your Work: After tamping, inspect the coffee puck. It should be smooth, level, and evenly compressed. If it’s uneven or the surface appears cracked, your shot may suffer from uneven extraction.
- Insert the Portafilter: Once you’re satisfied with the tamp, lock the portafilter into the espresso machine and start brewing immediately. Delaying this step can cause the puck to dry out, leading to inconsistent extraction.
Mastering the Angle
While tamping pressure is important, ensuring that the tamper is applied at a level angle is just as crucial. Even the most experienced baristas can make the mistake of tamping at a slight angle, which can throw off the entire extraction process.
An angled tamp creates areas of lower resistance in the puck, allowing water to flow too easily through those spots, while other areas may become over-saturated. The result is an uneven extraction, where the flavors are imbalanced, and the shot may taste weak or overly bitter.
To avoid this, it’s essential to hold the tamper as level as possible when applying pressure. For those who struggle with this aspect, tamping mats or tamping stations can help provide extra stability. These tools keep the portafilter in place, allowing for a more controlled, level tamp.
Flat vs. Convex Tamper: Which One Should You Choose?
One of the most common questions among espresso enthusiasts is whether to use a flat or convex tamper. Both options are widely available, but the type you choose can have a significant impact on your espresso shots.
The Differences Between Flat and Convex Tampers
A flat tamper is just as the name suggests—it has a flat bottom that compresses the coffee grounds evenly across the entire surface of the puck. Flat tampers are often the preferred choice for baristas who value uniformity and precision in their espresso-making process.
On the other hand, a convex tamper has a slight curve to its bottom. The idea behind a convex tamper is that it helps distribute pressure more evenly towards the center of the puck, theoretically reducing the chance of channeling. Some baristas find that convex tampers create a more forgiving tamp, especially for beginners or those who occasionally struggle with uneven tamping pressure.
Pros and Cons of Flat Tampers
- Pros:
- Ensures even compression across the entire surface of the puck.
- Ideal for achieving consistent, uniform extractions.
- Allows for greater control over the tamping process.
- Cons:
- Slightly more prone to channeling if the distribution of coffee grounds is uneven.
- Requires a bit more precision to achieve optimal results.
Pros and Cons of Convex Tampers
- Pros:
- More forgiving, as the convex shape directs pressure toward the center of the puck.
- Can reduce the risk of channeling in certain situations.
- Some find it easier to use when learning the proper tamping technique.
- Cons:
- May lead to slightly uneven extractions in certain machines or setups.
- Requires some adjustment if you’re used to flat tampers.
How to Choose the Right Tamper
Ultimately, the choice between a flat or convex tamper comes down to personal preference and your espresso-making style. Some baristas swear by flat tampers for their precision, while others prefer convex tampers for their ease of use. The best way to find out which tamper works for you is through experimentation.
If you’re new to espresso-making or struggle with consistent tamping, a convex tamper might be a good starting point. For more experienced baristas or those who enjoy fine-tuning their technique, a flat tamper offers greater control and precision.
Choosing the right tamping pressure and technique can make a world of difference in the quality of your espresso. Whether you prefer the precision of a flat tamper or the forgiving nature of a convex one, the key is to practice and fine-tune your process until you achieve the perfect shot.
Tamping Distribution: Why It’s Important
Achieving a perfectly tamped espresso puck starts well before you actually tamp—it begins with how you distribute the coffee grounds in the portafilter. Tamping is only effective if the grounds are evenly distributed before compression. Poor distribution leads to an uneven puck, resulting in a flawed extraction that affects both the flavor and the crema of your espresso shot.
The Importance of Even Coffee Distribution
One of the most common issues baristas face is channeling, where water finds weak spots or paths of least resistance through the coffee puck. This typically occurs when coffee grounds are unevenly distributed, causing some parts of the puck to be more densely packed than others. Water naturally flows more easily through the less compacted areas, leading to under-extraction in those spots and over-extraction in the areas that are too densely packed.
The result? An espresso shot that is inconsistent in flavor, often with a mix of bitter and sour notes. Even if you use the right tamping pressure and technique, poor distribution will sabotage the final result. Proper distribution, on the other hand, ensures that water flows uniformly through the coffee, delivering a balanced and full-flavored shot.
Techniques for Even Distribution
Several techniques can help you ensure even coffee distribution in the portafilter before tamping:
- Stockfleth’s Move: One of the simplest and most effective distribution techniques is the Stockfleth’s Move. This involves using your finger to sweep over the surface of the grounds in a circular motion to evenly spread the coffee across the basket. It’s an easy way to ensure there are no clumps or air pockets before tamping.
- Tapping: Some baristas lightly tap the portafilter on the counter to help settle the coffee grounds before tamping. This method works well for reducing air pockets but should be done gently to avoid over-compacting the coffee before you tamp.
- Using a Distribution Tool: A coffee distribution tool, also known as a leveler, is a device that ensures the coffee grounds are evenly distributed and leveled before tamping. It’s placed on top of the coffee, and when twisted or pressed, it smooths and levels the surface of the coffee puck. Many baristas find that using a distribution tool improves consistency, particularly in high-volume settings like cafés.
The Benefits of Proper Distribution
- More Even Extraction: When the coffee is evenly distributed, the water can flow uniformly through the puck, preventing channeling and ensuring even extraction. This leads to a more balanced flavor profile in the espresso shot.
- Better Crema: Evenly distributed coffee grounds lead to a better, more consistent crema—the golden, aromatic layer that sits on top of a well-extracted espresso. A thicker crema is often a sign of a well-made espresso shot.
- Consistent Shots: Consistency is key in espresso-making, especially in a café setting where customers expect their coffee to taste the same every time. Proper distribution helps you achieve that level of consistency, reducing the number of flawed or inconsistent shots.
Pre-Tamping: Is It Necessary?
Pre-tamping is a technique that some baristas use to lightly compress the coffee grounds before applying full tamping pressure. The goal is to gently settle the coffee and eliminate air pockets without compacting the grounds too much. Pre-tamping is somewhat controversial—some baristas swear by it, while others believe it’s unnecessary. Let’s explore whether pre-tamping is a step worth considering in your espresso-making process.
What is Pre-Tamping?
Pre-tamping involves applying a small amount of pressure—usually just enough to level the surface of the coffee puck—before doing the final tamp. This light compression can help distribute the coffee grounds more evenly, making the full tamping process easier and more consistent.
The Benefits of Pre-Tamping
- Improved Distribution: For baristas who struggle with achieving even coffee distribution, pre-tamping can be a helpful step. By applying light pressure, pre-tamping ensures that the coffee grounds are more evenly spread, reducing the risk of channeling.
- Reduced Channeling: Pre-tamping can help eliminate air pockets in the coffee puck, which are a common cause of channeling. By lightly compacting the grounds, you ensure that the water will flow more evenly through the puck.
- Smoother Workflow: In busy café settings, pre-tamping can speed up the workflow by making the final tamping process quicker and more consistent. It allows baristas to apply the final tamp more efficiently, which can be beneficial during peak hours.
The Downsides of Pre-Tamping
- Unnecessary for Some: For experienced baristas who already have excellent distribution techniques, pre-tamping may feel like an unnecessary extra step. If you can achieve even coffee distribution without it, pre-tamping might not be needed.
- Inconsistent Pressure: One of the risks with pre-tamping is that it can lead to inconsistent results if too much pressure is applied during the initial tamp. Pre-tamping should involve only a light touch—any more pressure, and you risk compacting the grounds too early, which can affect the final tamp and extraction.
When Pre-Tamping Might Be Useful
While not essential for every barista, pre-tamping can be beneficial in specific situations. If you’re working with a particularly large or deep portafilter basket, pre-tamping can help ensure that the grounds are evenly spread and eliminate air pockets. It’s also useful for beginners who are still mastering their tamping technique, as it can help improve consistency and reduce errors.
Ultimately, whether you choose to incorporate pre-tamping into your routine comes down to personal preference and experience. Experimenting with it in your espresso workflow may help you decide if it’s a valuable step for you.
Tamping Force: Does It Vary by Espresso Machine?
While tamping pressure and technique are largely the same across different espresso machines, the specific machine you’re using can influence how much tamping force you need to apply. Factors such as the machine’s brew pressure, portafilter size, and even the type of coffee being used can all play a role in determining the ideal tamping force.
How Espresso Machines Affect Tamping Force
- High-Pressure Machines: Commercial espresso machines, which typically operate at around 9 bars of pressure, require consistent tamping force to ensure even extraction. In these machines, tamping with around 20-30 pounds of pressure is usually ideal. However, some high-end machines with built-in pre-infusion systems may allow for a lighter tamp because the pre-infusion stage helps evenly saturate the coffee before full pressure is applied.
- Low-Pressure Machines: Home espresso machines, particularly entry-level models, often operate at lower pressures than commercial machines. In these cases, you may need to adjust your tamping technique. Applying too much pressure can lead to over-extraction, as the machine may not have the necessary power to push through a tightly compacted puck. For low-pressure machines, a slightly lighter tamp—around 15-20 pounds of pressure—might produce better results.
- Portafilter Size and Basket Shape: Different espresso machines come with varying portafilter sizes and basket shapes, which can influence the amount of tamping force needed. For example, larger portafilter baskets (58mm) found in commercial machines often require a firmer tamp compared to smaller baskets in home machines. The shape of the basket (flat vs. tapered) also affects how the coffee grounds are distributed and compacted, which in turn influences how much pressure you need to apply.
When to Adjust Tamping Force
While consistency in tamping pressure is important, there are times when adjusting your tamping force might improve the quality of your espresso. Here are a few scenarios where you may want to experiment with different tamping forces:
- Different Coffee Beans: If you’re switching between different coffee beans—especially light vs. dark roasts—you may find that adjusting tamping pressure helps optimize extraction. Lighter roasts, which are denser and less soluble, may benefit from a slightly firmer tamp, while darker roasts, which are more porous, may require a lighter touch.
- Grind Size Adjustments: If you’ve adjusted your grind size, you might need to tweak your tamping force as well. Finer grinds create more resistance to water flow, so a lighter tamp may prevent over-extraction. Coarser grinds, on the other hand, may need a firmer tamp to achieve even extraction.
- Machine Upgrades: If you upgrade to a more powerful espresso machine, you may need to adjust your tamping force to match the new machine’s capabilities. As a general rule, more powerful machines with higher brew pressures can handle firmer tamping, while less powerful machines may require a gentler touch.
By understanding how tamping force interacts with your espresso machine, coffee beans, and grind size, you can fine-tune your tamping technique to achieve the best possible extraction. Experimenting with different tamping pressures and paying attention to how your machine responds can help you become a more versatile and skilled barista.
Tamping Mat: Do You Really Need One?
A tamping mat might seem like an optional accessory in the world of espresso-making, but for many baristas—both professional and home enthusiasts—it’s an essential part of their workflow. While tamping mats don’t directly affect the flavor of your espresso, they serve important functions that can improve your tamping experience, protect your workspace, and even extend the lifespan of your espresso tools.
What is a Tamping Mat?
A tamping mat is a small, flat piece of rubber or silicone that is placed on the countertop where you tamp your espresso grounds. Its primary purpose is to provide a cushioned, non-slip surface for tamping, helping to keep your portafilter stable while you apply pressure. In addition to this, tamping mats protect your countertop from damage caused by repeated pressure and heavy tools like the tamper and portafilter.
Benefits of Using a Tamping Mat
- Protects Your Countertop: Repeatedly pressing a heavy tamper onto a hard surface can leave scratches, dents, and other signs of wear on your countertop, especially if it’s made of wood, stone, or laminate. A tamping mat acts as a protective barrier, absorbing the impact and preventing damage.
- Provides Stability: One of the keys to effective tamping is keeping the portafilter stable while you apply pressure. Tamping mats are designed to prevent slippage by providing a grippy surface for your portafilter. This ensures that you can tamp evenly and consistently without worrying about the portafilter moving.
- Cushions the Tamper: When you tamp directly on a hard countertop, the bottom of your tamper can wear down over time. A tamping mat provides a soft, cushioned surface, which helps protect the tamper and prolong its life.
- Keeps Your Workspace Clean: Espresso making can be a messy process, and tamping mats help contain some of that mess. Coffee grounds often spill during the tamping process, but with a mat in place, you can easily clean up the grounds by shaking or wiping off the mat instead of having them scattered across your counter.
- Ergonomics: Many tamping mats are designed to provide the right height and positioning for ergonomic tamping. Some mats even have raised edges or indentations for holding your portafilter securely in place, making the process more comfortable and efficient.
Different Types of Tamping Mats
There are a variety of tamping mats available, each offering slightly different features. Here are the most common types:
- Flat Tamping Mats: The simplest and most affordable option, flat tamping mats provide a basic rubber surface for tamping. They’re small, easy to clean, and portable, making them ideal for home baristas or those with limited space.
- Corner Tamping Mats: Designed to fit over the edge of a countertop, corner tamping mats offer extra stability by providing two flat surfaces: one for the portafilter and one for the tamper. These mats prevent the portafilter from sliding off the counter, making tamping more efficient and less prone to accidents.
- Tamping Stations: A step up from tamping mats, tamping stations provide a dedicated area for tamping, complete with a slot to hold the portafilter. These stations are ideal for professional settings where speed and consistency are crucial. They keep everything in one place, allowing baristas to tamp quickly and efficiently.
Do You Really Need a Tamping Mat?
While a tamping mat isn’t absolutely necessary for making espresso, it can significantly improve your tamping experience and help maintain the quality of your tools and workspace. If you frequently make espresso or want to protect your countertop and tamper, investing in a tamping mat is a smart decision.
Tamping Mistakes to Avoid
Even the most experienced baristas make tamping mistakes from time to time. Understanding the common pitfalls and how to avoid them can help you refine your technique and pull better espresso shots.
- Tamping at an Angle
One of the most frequent tamping errors is applying pressure at an angle. An uneven tamp causes water to flow through the coffee puck unevenly, leading to channeling. As a result, some areas of the puck are under-extracted while others are over-extracted, resulting in a poorly balanced espresso shot.
How to Avoid: Always make sure your tamper is level when pressing down. Hold the tamper perpendicular to the portafilter basket and press straight down to ensure even compression across the entire puck.
- Inconsistent Tamping Pressure
Inconsistent tamping pressure from shot to shot can lead to inconsistent results in your espresso. Even if your technique is good, varying pressure will cause water to flow through the coffee differently each time, leading to fluctuating extraction times and flavors.
How to Avoid: Focus on applying the same amount of pressure each time you tamp. Some baristas find it helpful to use tampers with built-in pressure gauges that “click” when the desired pressure is reached.
- Tamping Too Hard or Too Light
Tamping too hard can compact the coffee grounds too tightly, resulting in a slow, over-extracted shot that tastes bitter. Tamping too lightly, on the other hand, can cause water to pass through the coffee too quickly, leading to under-extracted, sour-tasting espresso.
How to Avoid: Aim for around 20-30 pounds of pressure, depending on your machine and grind size. Experiment to find the sweet spot for your setup, and practice to develop a consistent feel.
- Ignoring Coffee Distribution
If you tamp before properly distributing the coffee grounds in the portafilter, you’re setting yourself up for an uneven extraction. Uneven distribution can lead to channeling and poor-tasting espresso.
How to Avoid: Always take time to evenly distribute the grounds before tamping. Use your finger, a distribution tool, or the Stockfleth’s Move to ensure the grounds are spread evenly before you begin tamping.
Maintaining Your Tamper: A Quick Guide
Your tamper is an essential tool in your espresso-making arsenal, and like any tool, it needs to be properly cared for to maintain its effectiveness and longevity. Here’s how to keep your tamper in top shape.
Cleaning Your Tamper
Regular cleaning is the first step in maintaining your tamper. After each use, wipe the tamper with a damp cloth to remove any coffee grounds or oils that may have accumulated on the surface. Avoid using harsh chemicals, as they can damage the finish of the tamper. If your tamper is made of metal, occasionally polish it to keep it looking sharp and free from tarnish.
Inspecting for Wear
Over time, the bottom of your tamper may wear down from repeated use, especially if you tamp directly on hard surfaces without a mat. Periodically inspect the bottom of the tamper for any dents, scratches, or unevenness. If you notice significant wear, it may be time to replace the tamper or have it resurfaced.
Storing Your Tamper
Store your tamper in a clean, dry place when not in use. Some baristas keep their tampers in a designated stand or station to prevent them from rolling off the counter or being damaged. Keeping your tamper in a safe spot ensures it’s always in good condition and ready for use.
Conclusion
Tamping is more than just a simple press—it’s an art form that directly impacts the quality of your espresso. By mastering the nuances of tamping pressure, distribution, and technique, you can unlock the full potential of your coffee beans and create espresso shots that are rich, balanced, and consistently delicious. Whether you’re a beginner or a seasoned barista, refining your tamping skills will take your espresso-making to the next level.
From choosing the right tamper to avoiding common tamping mistakes, every detail matters in your pursuit of the perfect shot. Don’t be afraid to experiment with different tamping tools and techniques to find what works best for your setup. With practice and attention to detail, you’ll soon be pulling espresso shots that rival those of any professional café.